Note: If you are looking for a setup guide for GPI Case 2 with Retropi, Navendu Pottekkat wrote a great guide which you can find here. I have adopted his article structure for this write-up.
Prerequisite
Before you move on, make sure you have:
- Raspberry Pi Computer Module 4 (Lite version with WiFi recommended)
- GPi CASE 2
- A Micro SD card (at least 16 GB) and an adapter
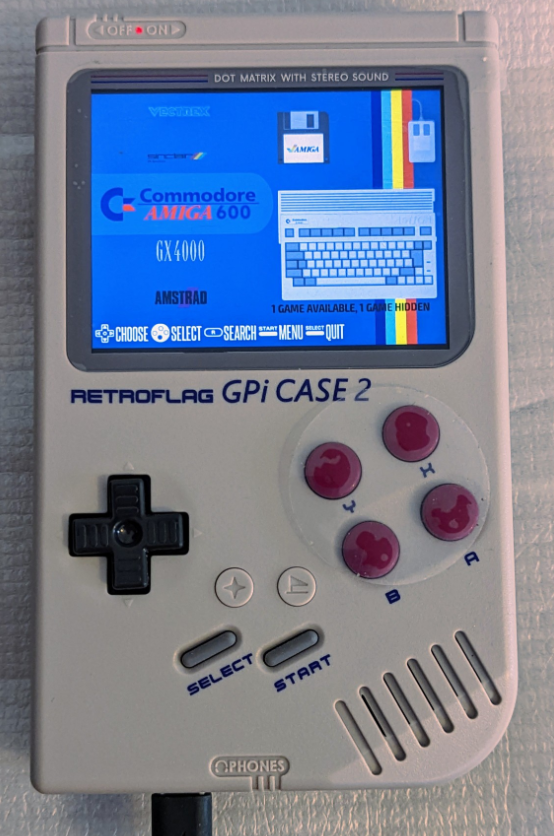
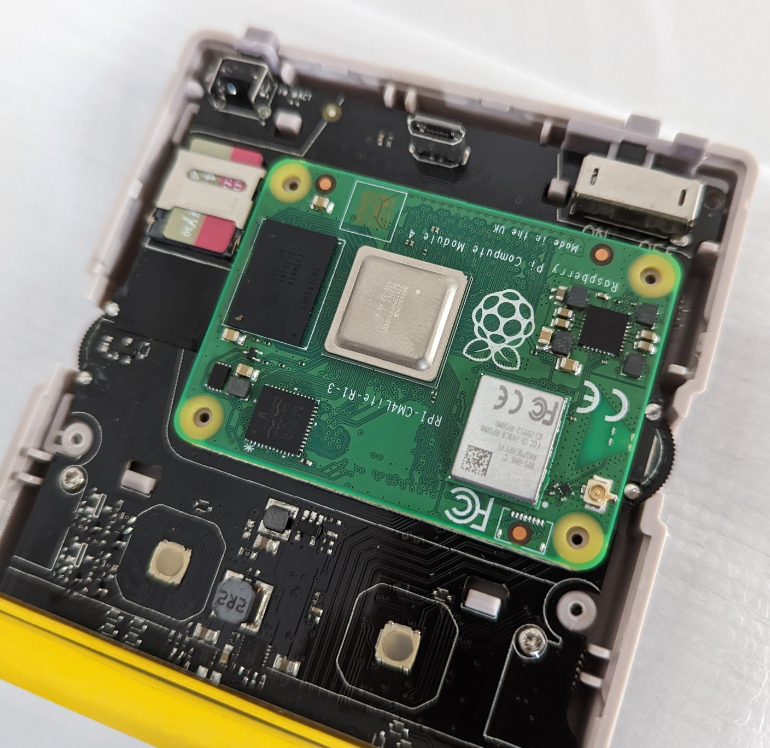
Inserting CM4 Into the GPi CASE 2
There is a best way to insert the Pi in the case:
- Remove the rear cover by removing the five screws on the back.
- The case is also held together by plastic tabs that you can open with a tool or other thin object. See HERE for a YouTube guide.
- Align the markings on the Pi and the case
- Click the Pi in place with even pressure. You should hear a click from both connector headers.
It is possible to insert the CM4 without removing the back cover, but is difficult to place the module correctly and press it into the headers if you have slightly thicker fingers. It definitely works better without cover.
Writing the Recalbox Image to the SD Card
The easiest way to download and write the RetroPie image is by using Raspberry Pi Imager.
You can download the Raspberry Pi Imager and open it. Connect your SD card to your computer through the adapter (if needed). You are now ready to write the image.
In the Raspberry Pi Imager, select the operating system. Choose “Emulation and game OS” and then:
“Recalbox“, and then “Recalbox – Rasperry Pi 4/400” OS.
Note: This Guide is based on Version 8.1.1, so choose this version or newer if available.
Select your SD card from the “Storage” option and click on “Write”. It will take some time to download and write the image to your SD card.
Installing Display Patch and Safe Shutdown
Since version 8.1.1, it is no longer necessary to install a shutdown or display patch for the GPi CASE 2. The necessary configurations are already included in the Image. If the patch is installed anyway, the OS will not boot!
First Boot
With your SD card configured, you can disconnect it from your PC and insert it into your GPi CASE. Before turning it on, connect it to power to ensure the battery does not die on the first boot. The first boot will take longer (a couple of minutes at least) than usual.
Once it is ready, you can start to configure your system.

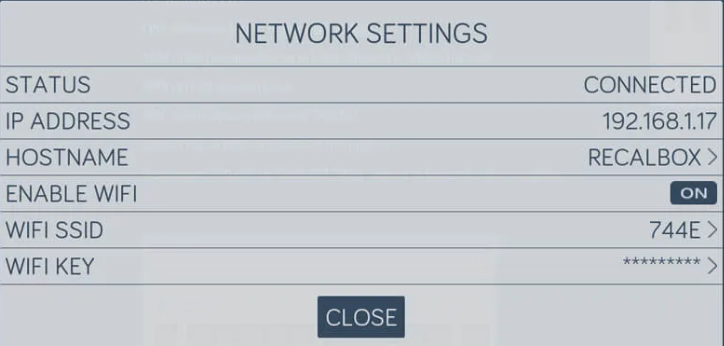
WLAN/ Controller settings
WLAN and Controller settings can be found under “Menu” (press Start). The internal controller of the GPi CASE 2 works out of the box, if you want to add more, you will find the possibilities in the menu.
For WLAN setup, Click on the “Start” button to open the configuration main menu.
Scroll down to “Network settings” and click on it.
A network setup menu will appear:
Install a different theme
If you don’t like the default theme, you can install an alternative theme. I liked the SuperRetroboy theme. You can download the file directly as a .zip file from github if you add "/zipball/master" to the path.
e.g. https://github.com/KALEL1981/es-theme-Super-Retroboy/zipball/master
Unzip the .zip and copy the extracted folder into the appropriate theme folder on the SD card. After that you can select the theme from the settings menu.
Troubleshooting
Back Screen
If your GPi CASE 2 device does not boot up and you only get a black screen but no output on your LCD, you can – if you have a GPi CASE 2 incl. dock (the dock is unfortunately not available separately) – try to get an HDMI output (default output is HDMI).
First boot completely without SD card, then you should get a boot screen with the info about the compute module.
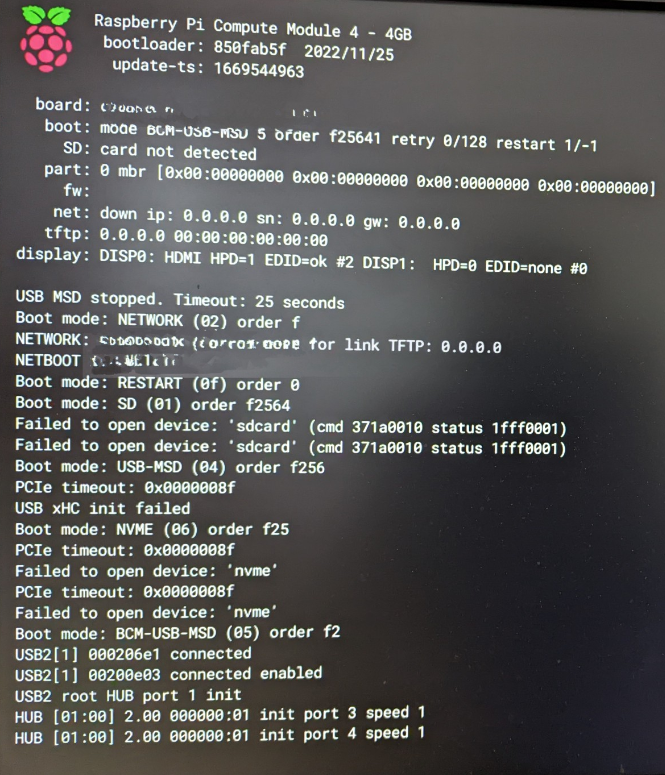
If no output appears at all, this can have the following possibilities:
- The compute module is not properly mounted on the board, you should hear a clicking sound on both the rear and the front panel. To be on the safe side, you can also open the case with the 5 screws on the back, unfortunately there are still latches on each side that you have to open carefully so that you can remove the back cover.
- Make sure your battery is charged
- The dock does not seem to be a simple USB hub, but is activated via a switch. Make sure you plug the GPi CASE 2 into the dock correctly. If the dock is plugged in, it is active and you will not get any LCD output (even if no HDMI cable is plugged in, but e.g. only power).
After installing the Recalbox SD card again, you may see an output over HDMI which says: “Error -110 whilst initializing SD card” or if you don’t have a dock and the LCD screen just stays black

Try to use a different SD card (especially if you are using a SANDisk SD card, which are otherwise reliable), preferably from a different vendor.
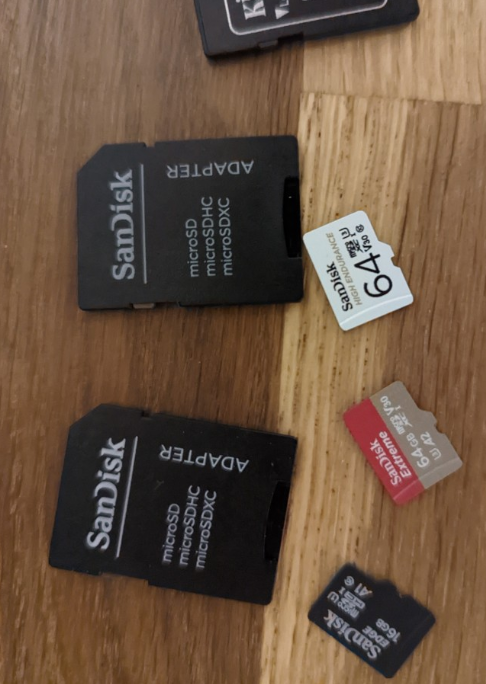
I had three different brand new SANDisk SD cards types that I bought from a reputable store, and all of them would did not boot. The cards ran fine in the PC. Even in a developer board (PiTray mini from Sourcekit) the cards booted flawlessly together with the same CM4 (using a CM4 with WLAN & BT, 4GB RAM, with no onboard flash memory (Lite) ). Back to GPi CASE 2, the screen was black. For me, only the change to a Kensington card has remedied.
(Believe me, since the card worked with the same CM4 on the PiTray, the “search” took a little longer).